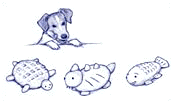
Sculptured Bread
 By using your
imagination, you can create your own delightful bread
shapes. Use raisins or currants for eyes, strips of orange
peel for fins or feathers, strands of thin spaghetti for
long whiskers perhaps, wheat berries or pine nuts for
teeth-whatever strikes your fancy.
1 package (1 scant tablespoon) active dry yeast
1/4 cup warm water
1/3 cup sugar
2 large eggs
4 tablespoons (1/2 stick) butter, melted
1/4 cup light cream or milk
1 teaspoon vanilla
1/2 teaspoon salt
1 teaspoon grated orange rind
2-1/2 to3 cups white flour
Glaze
1 egg mixed with 1 teaspoon water
Put the yeast in a medium bowl and mix with the warm water and sugar. Stir with your finger, and when the yeast has dissolved, add the eggs, butter, cream or milk, vanilla, salt, and orange rind to the yeast and beat until thoroughly mixed. Stir in 2-1/2 cups of the flour, then turn the dough out onto a floured work surface and knead, adding more flour as necessary, until smooth, 6 to 7 minutes.
Clean the bowl, rub the inside with softened butter, and return the dough to it, turning to coat. Cover with plastic wrap and leave in a warm place until doubled in size 1-1/2 to 2 hours (the higher proportion of sugar and eggs will make this dough slower to rise, and it does need a warm place, such as in a turned-off oven with a pilot light or near a radiator).
 Turn the dough out and
tear off as much of it as you want to work with, covering
the remainder with a kitchen towel. If you want to make a
long shape, roll your piece out and then flatten it. This
dough has a will of its own and may suggest a form to
you-perhaps a fish, a bird, a rabbit, a turtle, a snail, or
some prehistoric creature. Put the "body" on a greased
baking sheet. If you want to make legs or a tail, pinch off
a small piece from the remaining dough, roll it into shape,
and then attach it to the main body by brushing the edges
with glaze, poking a hole in the dough where you want it to
go, and then inserting it. Make round balls for ears and
noses. Decorate your shapes however you wish.
Cover the shapes lightly with a kitchen towel, and let rise again for 45 minutes, until doubled in size. You will notice how your shapes change and take on a life of their own as the dough swells.
After the bread has risen for 30 minutes, preheat the oven to 350 degrees F. Paint the surface of your sculptures with the glaze, and if you want to carve a pattern on the surface, do so with the tip of a sharp knife.
Bake in the preheated oven for 20 to 25 minutes, depending on how thin your sculpture is. Watch carefully, and if some of the extremities seem to be browning too much, cover them with foil.
When the shapes are golden, remove them from the oven. While still warm, lift the shapes off carefully, using one or two spatulas, and let cool on racks.
from:
Knead It, Punch It, Bake It!:
The Ultimate Breadmaking Book for Parents and
Kids
By Judith and Evan Jones
Illustrated by Mitra Modarressi
Houghton Mifflin Company
Hardback, $16.00
144 pages, Concealed Wire-o binding
ISBN: 0-395-89256-2
Recipe reprinted by permission.
Knead It, Punch It, Bake It!
Back to the main Kids' Cookbooks page.
This page created November 1999

Search this site:
Recipes
About These Recipes
Breakfasts, Brown-Bags & Breads
Brown-Bag Barcelona Chicken
Buttermilk Basil Dressing
Chinese "Barbecued" Pork
Cool-as-a-Cucumber Dressing
(A No-Flame, No-Fire Recipe)
Cranberry-Cinnamon
Poached Pears
Green Onion French Bread
Happy, Dappy, Flappy Jacks
Irma's Spiced Nuts-to-You
Mango-Cheese Quesadilla
Mexican Fiesta Taco
or Burrito Mix
Orange-Scented Couscous
Tips
Ten Items for Your
Kid's Cookware Kit
Kid-Friendlier Recipes
About Ingredients
Cooking with Fahrenheit
Eating wine and spirits
Cookie sheet & jelly roll pan
More Cooking Tips
General Cooking Tips
Food at Hand: Eating
Finger Foods
Alexandria's Top Ten Cooking
Tips for Other Kids
Ten Kids-in-the-Kitchen
Commandments


